


Sunday, October 25, 2009
Halloween Spooktacular Meme

Thursday, October 22, 2009
THEY'RE BACK
Do you remember these? YUM!!
What are you missing from your childhood, that you wish they would bring back?
Wednesday, October 21, 2009
Spooktacular Pumpkins and Cakes!
Hey LISA, Why can't you do both?
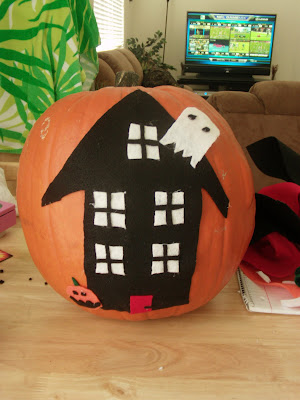
What a great idea! You are so SMART! So this weekend The Boy and I felted our pumpkins. The BF is going to spray paint his pumpkin once he draws up a "killer" stencil. We will see, if that happens. I think the pumpkins turned out pretty well. It was more time consuming then I was expecting it to be, however I think it was worth it.
Since Halloween is on a Saturday this year, we will carve and bake our pumpkin seeds on Halloween!
Materials needed to FELT your PUMPKINS.
$.37 felt squares (purchased at Walmart) I forgot to buy Yellow for the windows. Oh well.
Scissors
Hot Glue Gun
Pencil and Paper
Draw out a stencil of what you would like your pumpkin design to become. Then place the stencil on the felt and cut. Hot glue the felt together if needed and then just hot glue the entire project to the pumpkin. Since we are carving our pumpkins on Halloween, I only glued the corners of the project to the pumpkin. This will make it easier to remove and hopefully we will be able to re-use the felt designs again next year.
Now for our SPOOKTACULAR CUPCAKES!
I cheated in making these cupcakes. Hey it's been a long weekend and I can cheat whenever I want to cheat. Don't judge me. I cheated by using STORE BOUGHT ICING, instead of making my own. I'm disappointed in myself but I just didn't want to deal with the mess and time of making my own frosting.
I printed out these wonderful Halloween Cupcake Toppers. I found them on Two Hearts Together's blog. I then used my neighbors circle punch to punch them out. I taped the cutouts to toothpicks so I could stick them in the cupcakes.
The Boy helped me to decorate the cupcakes. I frosted while he put on all the sprinkles.
Monday, October 19, 2009
Vampire on the loose!
We visited the Smith Family Farm and for $9 you got to do the following:
1) Visit the Petting zoo. Only there were signs up that said, please do not pet the animals, they bite. HMMMMMM
2) Visit and learn about the Indians
3) Barnyard Ho Down (You sit in a barn and sing songs, we skipped this one. It was way to hot and muggy to be in a small crowded barn.)
4) Corn Maze (We skipped this one, It was way too muddy.) We did do the kiddy hay maze though.
5) Hay Ride out to the pumpkin patch
6) Pick a pumpkin of your choosing. It can be any size, but you have to carry it yourself
Our first stop after taking a picture at the entrance, was the so called petting zoo.
There were rows upon rows, upon rows and rows of Pumpkins. We even saw some of these beauties!
Out of the corner of my eye, I spotted the Vampire. Looks like he found himself a big one!
It was a really great fun day at the Pumpkin Patch. The Vampire decided he wanted to go home with us, so The BF and I figured, sure, why not!
Monday, October 12, 2009
Halloween Spooktacular - Triple Threat!
I created all of these great items in about 2hrs. YES 2hrs! I'm a busy girl and only have time to create crafts that don't take me FOREVER to make. That and I just don't have patience for anything that takes more than an hour.
Plus you know, I'm a busy person! People to see, autographs to sign, 40th Birthday parties to attend and work to be done. Yes I have TWO jobs and sometimes I have to work on the weekends. Luckily i'm able to work from home.
LET'S get ready to RUMBLE!
First up on the craftacular, spooktacular list.
GHOST TREES!
Now I've seen this tree on a lot of blogs, It was my idea first people! LOL just kidding, every blog I have seen this on, I thought did a wonderful job. One blog stuck out over the rest, BE DIFFERENT ACT NORMAL, created a giant version of the ghost tree. Click on the link and check it out! While you are on her blog, you have to peek around, she's got some great Halloween crafts and ideas. I originally got the idea of the Ghost tree from Crafting Chicks, however I couldn't find "cheap" Halloween ornaments.
This project COST ME $.96 cents!! I like to round my numbers so in my eyes this project cost me ONE Dollar. YEAH you read that right ONE DOLLAR TO MAKE this wonderful project!
"Oh my gosh LISA, how did you manage to do that?"
Well I'll tell you how. I warned you people to have patience. Sheeesh!
The great orange pot? I've had that sitting around the house since ummm the beginning of summer. I tried to grow herbs in it, and well, let's just say I'm not good at gardening. The branches? Yeah I took those from my neighbor A's tree in her backyard. Well of course she knew I took them, she did let me into her backyard and all. The spray paint? The only item I had to purchase, $.96 cents from Walmart. Booh YA SON! The ghosts? Those are just tissues, and I have a ton of tissue boxes all over the house. I used white thread The BF gave me out of his sewing kit to hang the ghosts.
Now for the moment you have all been waiting for. Here it is, in all it's ghostly glory!
Why do all my crafts look so much better in person? I guess like me, my crafts are just not photogenic
Up next
BLING BLING PUMPKINS
My son can vouch for me that I like to bling out anything I can. Yeah I blinged out his DS and he took off all the bling, because he thought it was too "girly!" Whatever BOY, do you how long it too me to put each little crystal on your DS to spell your name?
Anyway, I purchased these cute little pumpkins for $.25 each at Lucky's the other day and was trying to figure out what I could do to them to "spice" them up. Then I saw these glitter pumpkins over at I WANT TO MAKE THAT, day 9 of her 31 day Halloween challenge. I thought I had glitter hanging around the house, NO LUCK, all I could find was glitter glue and I just wasn't feeling that. Then I found these cute metallic leaves and thus the BLING BLING pumpkin was born.
This craft cost me $.50 to make.YUP FIFTY CENTS, the cost of the pumpkins. I already had the glue and metallic leaves floating around the house.
So for under $2, I was able to make TWO Spooktacular Crafts! Talk about using YOUR STASH
Now for this weekends grand finale!
HALLOWEEN TRICK OR TREAT BAGS!
I told you all how I was planning to make the kids Halloween trick or treat bags, right? If not go read my past Spooktacular posts. Well I finally got to making them and let me tell you, I can bust these bags out ALL DAY. I think it takes me maybe 5 minutes to make each bag. That's right 5 minutes, cause I'm super fast like that!
All you need is some Halloween fabric. I purchased 1/2 yard of each design (except the grey and black skulls) and was able to complete 1 bag out of that half yard. The BF had some thin rope hanging out in the garage and I purchased the black thread when I was buying the fabric at Walmart. The Pumpkin and pirate skulls fabric was a little over $1 for a half yard. The Black and Grey skulls were more expensive at $4.44 for a yard. The Boy wanted the skulls, how do you say no to a cute spoiled 9 year old?
I have to thank, Valerie over at Frugal Family Fun Blog and her online sewing class for this project. Check out her blog! Her and her daughters create the best crafts, EVER!
Come back next week for more Halloween Spooktacularness.
Thursday, October 8, 2009
Vampires and Puzzles, Oh My!
While I was in the process of making the Pumpkin Poop and Pixie Tricks (check my post from yesterday to find out what I'm talking about, ) The Boy wanted to join in on the crafting fun.
Here are some of the things he made:
Can you solve his puzzle? He even made candy treat bags to give to someone who solves it. He was so proud, because he used my tape gun to "permanently" close the treat bags.
So if you can't solve the puzzle just let me know and I'll give you the answer. The BF guessed it right away and the next morning next to his alarm clock he found a mysterious bag of candy, for getting the answer correct. It was so cute and funny! You had to be there, no really!
He also made this:
What were you and your little ones up to this weekend?
Don't forget to link up all of your arts and crafts projects, in the Smell the Coffee Lisa - Craft Swap.
Wednesday, October 7, 2009
What do you get when you mix Pumkin Poop and Pixie Tricks?
Yeah I said pumpkin poop, so what! I mean didn't you ever read that book, Everyone Poops? Read the poem and you'll understand why this year we will not be carving our pumpkins. We'll be "felting" them instead. I can't wait for you all to see how spooktacular they turn out.
This week I'm getting straight to the point, leaving out all the unnecessary TALKY TALKY, that I tend to do. Who am I kidding. PAAALEASE!!
Making it's first debut on Smell the coffee Lisa, I now present to you:
PUMPKIN POOP
I Googled "Pumpkin Clip Art" to find the cute little pumpkin logo and then just copied and pasted it into Microsoft Word. I then pulled the cute poem from Organized Christmas, and typed into the Word document. I used my neighbor D's funky scissors to cut out the poem and just used my glue tape to tape it onto the cut (I cut it up myself with regular scissors) orange poster board I purchased from Walmart for $.57. The yummy Pumpkin Poop found inside the pumpkin designed treat bags (I had these left over from the Halloween Treat boxes) are no other than Reeses Pieces. Can you say YUM? I think the Boys ate more of the candy then I actually used to make the project.
I made a total of 5 of these.
The plan is for me to make all the kids trick or treat bags. There are 5 kids, all boys (My son, his brother, RJ the neighbor and my two nephews.) Sheesh I hope I'm not leaving anyone out. I hate that feeling, like when you are forgetting something or someone. Anyway, I can't give the kids empty trick or treat bags, that would be just wrong. So inside each of the bags they will find their Halloween Treat boxes, Mummy Gum, Pumpkin Poop and these cool Pixie Tricks (all these items can be found on my blog, click on Halloween under labels on my left side bar) you're about to see. Who knows what else will be inside the treat bags.
I don't know this is all I've made so far.
Now without further ado, I now present to you:
Pixie Tricks (Yeah I thought of these all by myself, can you believe that? I'm serious, I didn't steal it from anyone. Okay maybe an idea here or there, but not one specific place.)
I purchased a bag of Pixie Sticks from Walmart and I actually bought the cute tags I glued to the pixie sticks off ebay, 30 for $2. I would have made them but I don't own the cute flower punch and neither does D my neighbor. Anyway both sides of the pixie sticks have a different Halloween picture on it. The orange ribbon, I believe I purchased from Walmart and had on hand. The green jar The BF had sitting in the garage.
Being the genious that I am, I thought for now, until I put these in the kids treat bags, I'd use the jar and left over Reeses Pieces to make a cute table centerpiece. Now if I can just keep The Boy from eating all the Reeses Pieces, this display might actually last a week or twoI wish I had more of the cute cut outs, I don't think 15 of them are enough.
Just in case you were wondering, I'm totally taking donations so I can purchase my own paper punches. I've found them for $13.95 each on ABC Distributing, plus you have to pay shipping. Let me know if you'd like my pay pal information to make a donation. LOL
So that's all I've got for this weeks Halloween Spooktacular. Coming up next week, a Spooky Halloween Tree (I've already picked my branches). Now if I could just find some cheap miniature Halloween ornaments before the end of the week. Any suggestions? If not it will be a Spooky Ghost Tree!
Oh what the heck, one more photo for good measure.
You all come back now you hear!
TODAY I AM GUEST POSTING ON FRUGAL MOM KNOWS BEST!! YUP GO CHECK OUT HER BLOG FOR CREATIVE CRAFTS, GREAT GIVEAWAYS AND FRUGAL BUYS!!
Don't forget to link up all of your arts and crafts projects, in the Smell the Coffee Lisa - Craft Swap />
Saturday, October 3, 2009
Mod Podge, Schmod Podge
So I had to, of course, GOOGLE this supposedly godly treasure that everyone keeps using and blogging about!
So here is what I found, courtesy of http://www.plaidonline.com/apmp.asp#ModPodgeBrands:
History of Mod Podge
The inventor of Mod Podge, Jan Wetstone, first developed Mod Podge in the 1960s in her garage. The name of this now-famous mixture came from the term "Modern Decoupage." She tested it on all kinds of surfaces; she even decoupaged a Volkswagen Beetle using bed sheets!
Over the years, Mod Podge has grown to become a favorite of crafters everywhere, including Martha Stewart, Rosie O'Donnell and Creative Juice television show co-hosts, Cathie Filian and Steve Piacenze.
Classic Mod Podge - The original Mod Podge formula that’s a glue, sealer and finish all in one! Use this crafting favorite to decoupage almost anything on wood, glass, terra cotta, metal, canvas and more, then seal with a top coat of Mod Podge. Projects dry to a protective matte or gloss finish. Available in multiple sizes to suit any project including a gallon bottle for group projects or classes.
Satin Finish Mod Podge - The same great performance and versatility of original Mod Podge in a Satin finish. Projects dry to a soft-to-the-touch finish with a subtle sheen. Perfect for home décor projects such as picture frames, wall or door plaques, decorative boxes and more. Available April 2007.
Brushstroke Mod Podge - Enhance projects with a textured finish! New Brushstroke Mod Podge is a top coat finish with a highly visible, dimensional texture. Simply apply over posters, prints or to decoupaged canvas projects for an artistic look that’s an affordable alternative to genuine painted wall art. Available in matte or gloss. Available April 2007. Fabric Mod Podge - Embellish wearables, linens and home décor like never before! Decoupage with Fabric Mod Podge! Specially formulated to adhere fabric to fabric or paper to fabric, Fabric Mod Podge expands your creative projects to include a variety of textile surfaces. Customize a denim jacket or jazz up a ready-made pillow or tablecloth in minutes-- you’ll have made something truly unique.
Paper Mod Podge - An acid-free formula that is friendly to paper crafting! Paper Mod Podge is perfect to use when decoupaging paper-to-paper and to keep photographs and papers from yellowing.Extend the life of your memory, cardmaking, scrapbooking and altered art projects with Paper Mod Podge.
Outdoor Mod Podge - Protect your projects from moisture and other outdoor elements with Outdoor Mod Podge. This specially formulated Mod Podge provides a water-resistant finish so projects stay as beautiful as the day you made them. Use on wood, tin, terra cotta, slate and more. Perfect for creating decorative accessories for your door, front porch or patio.
Sparkle Mod Podge - Add glitz and glimmer to any decoupage project with Sparkle Mod Podge. This formula has the all-purpose performance of original Mod Podge with the added bonus of sparkle. A fun and festive touch to jewelry, fashion accessory or holiday projects.
Puzzle Saver Mod Podge - Preserve a favorite puzzle with Mod Podge Puzzle Saver™. Fun and easy to use, this formula secures your puzzle pieces together and provides a protective topcoat. A great way to use completed puzzles for wall art or other decorative uses.
Mod Podge Glitter -Mod Podge Glitter offers the same great Mod Podge formula with a glitter finish! Metallic sheen show up great on dark surfaces.
Glow-in-the-Dark Mod Podge - Create fun, glowing crafts for a child’s room, Halloween, science fair projects and other imaginative creations! Glow-in-the dark pigments add a glow effect to your favorite decoupage surface- works well on wood, foam, paper mache and other surfaces.
WHAT THE?????
OMG, is that it? Are there not any more types of this Mod Podge stuff?
I mean seriously, if I was confused before about this stuff before, now I'm just totally lost about which one I need. Who would have thunk there would be so many different kinds. OH MY!!
SO WHICH ONE DO I BUY? What Mod Podge do you always have on hand? Isn't this a little bit crazy and totally cool all at the same time?
So I stole this picture from my Blogger Buddy, who actually inspired me to write this post, MIMI over at 4 Living In France.
http://4livinginfrance.blogspot.com/2009/09/mod-podge-mania-ive-been-waitin-for.html
I'm so going to get me some of this Mod Podge. Crafter buddies look out, I'm on a mission to make crafts as grand as MIMI's! I really don't think I can get grander then hers though!
WHAT HAVE YOU MOD PODGED LATELY? SO LINK UP and I Challenge you to visit 3 blogs above your name. If you are 1 thru 3 to link up, come back and visit 3 blogs!
**If you don't Mod Podge it's totally ok, then just link up with any of your favorite crafts**
**Feel free to send me any tutorials. UMM Yeah cause I'm not that crafty to figure out, once I buy this stuff, how to actually use it!!**
So MIMI said - Don't be scared to use, it's fool proof, anyone can use it!
So don't be afraid to try it people!
Happy Mod Podging!!